Deploy Your Next.js App on DigitalOcean: A Step-by-Step Guide

Minh Vu

By Minh Vu

Updated Feb 11, 2024

Figure: Deploy Your Next.js App on DigitalOcean: A Step-by-Step Guide

Disclaimer: All content on this website is derived directly from my own expertise and experiences. No AI-generated text or automated content creation tools are used.

You are looking for a way to deploy your Next.js application on a DigitalOcean Droplet in 2024, but you don't know where to start. This guide is for you.

In this step-by-step guide, I will show you how to deploy a Next.js application on a DigitalOcean Droplet. The steps are put in order in the Table of Contents below so that you can keep track of your progress.

By the end of this guide, you will have a production-ready and publicly accessible Next.js application running on a DigitalOcean Droplet.

Let's get started!

Contents

Prerequisites

Before you start, you need to have the following:

  • A Next.js application that you want to deploy.
  • A GitHub or GitLab account, so that you can pull your code inside the Droplet.
  • A DigitalOcean account. You can use my DigitalOcean referral link to get a free $200 credit for 60 days, so you can try it out without any cost.
  • A domain name that you want to use for your application (optional).

Deploying Your Next.js App on DigitalOcean

1. Create and Configure a DigitalOcean Droplet

The very first step is to create a DigitalOcean Droplet. A Droplet is simply a virtual private server (VPS) that you can use to host your application.

If you don't have a DigitalOcean account yet, you can sign up for one using my DigitalOcean referral link to get a free $200 credit for 60 days. A credit card is required for verification, but you won't be charged anything now.

Create a Droplet

Once you created your account, you can go to the Droplet section on the left sidebar and click on the "Create Droplet" button.

Now, you will have to pick some configuration for your Droplet:

  1. Choose Region: Select the region that is closest to the audience who visit your site. I will choose "New York" and the "NYC3" data center for this guide.
    DigitalOcean Droplet: Choose Region
    Figure: DigitalOcean Droplet: Choose Region
  2. Choose an image: We will be using "Ubuntu" with version "22.04 (LTS) x64" in this guide.
    DigitalOcean Droplet: Choose Image
    Figure: DigitalOcean Droplet: Choose Image
  3. Choose Size: A Regular CPU of $6/month is enough for our example. You can always upgrade later if your app needs scaling.
    DigitalOcean Droplet: Choose Size
    Figure: DigitalOcean Droplet: Choose Size
  4. Choose Authentication Method: We will use a password first, then we will set up SSH keys later.
    DigitalOcean Droplet: Choose Authentication Method
    Figure: DigitalOcean Droplet: Choose Authentication Method
  5. Hostname: Enter a name for your Droplet that you can remember. I will use nextjs for example.
    DigitalOcean Droplet: Change Hostname
    Figure: DigitalOcean Droplet: Change Hostname

After you have selected all the options, click on the "Create Droplet" button at the bottom of the page and wait for the Droplet to be created.

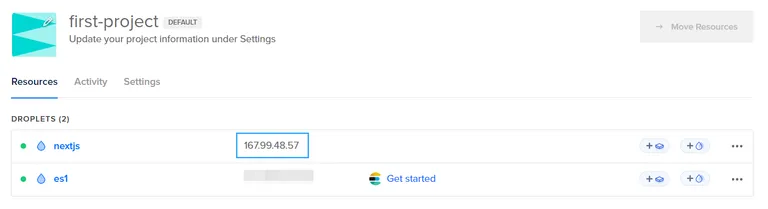
When the Droplet is created, you will see a dashboard with the IP address of your Droplet like this:

DigitalOcean Droplet Dashboard with Droplet IP Address
Figure: DigitalOcean Droplet Dashboard with Droplet IP Address

Let's configure your new Droplet in the next section.

Configure the Droplet

In this section, we will configure the Droplet by adding SSH keys and setting up the firewall.

First of all, you will need to access the Droplet using SSH with the root login. Follow the instructions below to do so:

  1. Open a Terminal on your local machine and use the following command to SSH in as the root user (insert your Droplet's IP address in place of droplet_ip_address):

    terminal
    ssh root@droplet_ip_address
  2. You will be asked to confirm the connection by typing "yes" and then providing the root password you created when you created the Droplet.

    Accessing DigitalOcean Droplet with SSH
    Figure: Accessing DigitalOcean Droplet with SSH

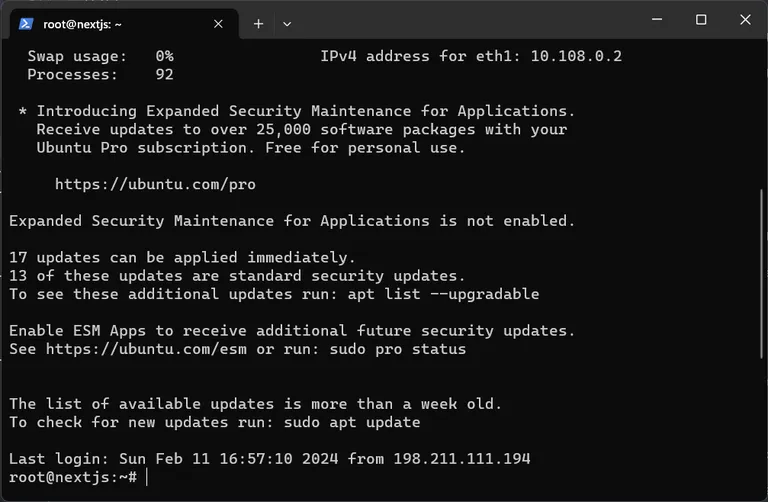
If a screen like this appears, you have successfully logged in to your Droplet:

successfully Logged into Droplet with SSH
Figure: successfully Logged into Droplet with SSH

Set up the Firewall to Allow SSH

Now, we want to set up the Firewall to secure the server. Follow the steps below to configure the Firewall:

  1. In the Terminal, type the following command to enable the UFW (Uncomplicated Firewall) and allow SSH connections:

    terminal
    sudo ufw allow OpenSSH

    Then, type the following command to enable the firewall:

    terminal
    sudo ufw enable

    You will be asked to confirm the firewall setup by typing y and then pressing Enter.

  2. You can check the status of the firewall by typing:

    terminal
    sudo ufw status

    You should see a message like this:

    Status: active
     
    To                         Action      From
     
    OpenSSH                    ALLOW       Anywhere
    OpenSSH (v6)               ALLOW       Anywhere (v6)
    Configure Firewall Rule on DigitalOcean Droplet to Allow SSH Access
    Figure: Configure Firewall Rule on DigitalOcean Droplet to Allow SSH Access

In the next section, we will install and configure Nginx as a reverse proxy to serve your Next.js application.

2. Install and Configure Nginx

Nginx is a popular web server software that can also be used as a reverse proxy, load balancer, and HTTP cache.

In this guide, we will use Nginx as a reverse proxy so that your Droplet IP address can be accessed via the browser.

Install Nginx

To install and configure Nginx, follow the steps below:

  1. Inside the Terminal, type the following command to update the package list and install Nginx:

    terminal
    sudo apt-get update -y && sudo apt-get install nginx -y

    The apt-get command will install Nginx along with any other required dependencies.

  2. When the installation is complete, you can check the status of Nginx by typing:

    terminal
    sudo systemctl status nginx

    You should see a message like this:

    output
    ● nginx.service - A high performance web server and a reverse proxy server
       Loaded: loaded (/lib/systemd/system/nginx.service; enabled; vendor preset: enabled)
       Active: active (running) since Sun 2024-02-11 17:31:34 UTC; 1min 19s ago

    This means that Nginx is running and ready to use.

Update Firewall Rule to Allow Nginx

Nginx is working now, but the Firewall is still blocking the HTTP traffic. We need to allow HTTP traffic to pass through the Firewall.

To check if Nginx is listed in the UFW application profiles, type the following command:

terminal
sudo ufw app list

You should see a list of application profiles like this:

output
Available applications:
  Nginx Full
  Nginx HTTP
  Nginx HTTPS
  OpenSSH

As of now, we currently do not have a domain (we will configure it later), so we will only allow HTTP traffic. To do so, type the following command:

terminal
sudo ufw allow "Nginx HTTP"

You can check the status of the firewall by typing:

terminal
sudo ufw status

You should see a message like this:

output
Status: active
 
To                         Action      From
 
OpenSSH                    ALLOW       Anywhere
Nginx HTTP                 ALLOW       Anywhere
OpenSSH (v6)               ALLOW       Anywhere (v6)
Nginx HTTP (v6)            ALLOW       Anywhere (v6)

Now, you can access your Droplet IP address in the browser and see the default Nginx landing page. Remember to use the http:// prefix before the IP address as we only allow HTTP traffic for now.

Nginx Default Landing Page
Figure: Nginx Default Landing Page

3. Install Node.js and NPM

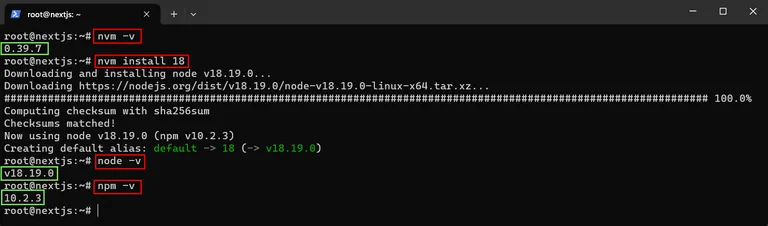
You will need Node.js and npm to run your Next.js application on the server. Please note that for Next.js 14, you will need Node.js version 18.17 or higher.

In this section, we will install:

Follow the steps below:

  1. Inside your Terminal, type the following command to install NVM:

    terminal
    curl -o- https://raw.githubusercontent.com/nvm-sh/nvm/v0.39.7/install.sh | bash

    Then, close the Terminal and open a new one to refresh the Terminal configuration.

    NVM will be installed on the server so that you can use NVM to install Node.js in the next step.

    To check if NVM is installed successfully, type the following command:

    terminal
    nvm -v

    The message should look like this:

    output
    0.39.7
  2. To install Node.js, use the command below:

    terminal
    nvm install 18

    Wait for Node.js version 18 to be installed. NPM will also be installed on the server.

  3. To check if Node.js is installed successfully, type the following command:

    terminal
    node -v

    The message should look like this:

    output
    v18.19.0
  4. To check if NPM is installed successfully, type the following command:

    terminal
    npm -v

    The message should look like this:

    output
    10.2.3
Install NVM, Node.js, and NPM on the Droplet
Figure: Install NVM, Node.js, and NPM on the Droplet

Now that Node.js and NPM are installed, we will move to the next section, which is to deploy your Next.js application.

4. Deploy Your Next.js Application

I can feel your excitement when reading this section. Your Next.js application will be accessible on the Internet in a short moment. Let's get started!

Push Next.js Application to GitHub

In this guide, we will use GitHub to store the source code of your Next.js application so that we can pull it into the Droplet later.

For other source code management providers like GitLab, Bitbucket, etc., the steps are similar.

If you have already pushed your Next.js application to GitHub, you can skip this step.

Follow these steps to push your Next.js application to GitHub:

  1. Create an account on GitHub if you don't have one yet.

  2. Create a new repository by clicking on the "New" button on the top left corner of the GitHub dashboard.

    Create a New Repository on GitHub
    Figure: Create a New Repository on GitHub
  3. Fill in the repository information:

    • Repository name: I will put digitalocean-nextjs for example.
    • Tick the "Private" option to keep your code private.
    GitHub Repository Information
    Figure: GitHub Repository Information
  4. Click "Create repository" to create the repository.

  5. On the created repository page, you will see the remote repository URL. Copy the URL to your clipboard.

    GitHub Repository Remote URL
    Figure: GitHub Repository Remote URL
  6. Go back to your Terminal and navigate to your Next.js application folder. For example:

    terminal
    cd /path/to/your/nextjs-app

    If you don't have a Next.js application yet, you can create one by typing the following command:

    terminal
    npx create-next-app@latest nextjs-app

    Then, follow the instructions to create a new Next.js application.

    The project structure should look like this:

    nextjs-app
    ├── .gitignore
    ├── node_modules
    ├── pages
    ├── components
    ├── package.json
    ├── package-lock.json
    ├── ...

    If you use the src directory, the pages, components, etc. will be inside the src directory, but it doesn't matter.

  7. Initialize a new Git repository by typing the following command:

    terminal
    git init
    git remote add origin <YOUR_REPOSITORY_URL>

    Replace <YOUR_REPOSITORY_URL> with the URL you copied from step 5.

    For example, mine will look like this:

    terminal
    git init
    git remote add origin https://github.com/dminhvu/digitalocean-nextjs.git
    Initialize Git for Next.js App
    Figure: Initialize Git for Next.js App
  8. Add push all the files to the repository by typing:

    terminal
    git add .
    git commit -m "init"
    git push --set-upstream origin main

    If you created the Next.js app by using the npx create-next-app@latest command, you can ignore the git add . and git commit -m "init" commands as the create-next-app command has already done that for you.

    If you are asked to log in to your GitHub account, do so and then try the git push command again.

    After the push is successful, you can go to your GitHub repository and see the source code there.

    GitHub Repository with Pushed Code
    Figure: GitHub Repository with Pushed Code

Now that your Next.js application is on GitHub, we will move to the next step, which is to pull the code into the Droplet.

Pull Next.js Application into Droplet

In this section, we will create an SSH key pair on the server to pull the Next.js application from GitHub into the Droplet.

Follow the steps below to pull the code into the Droplet:

  1. Go to the Terminal on the server, and type the following command to create an SSH key pair:

    terminal
    ssh-keygen -t rsa

    You will be asked to provide a file name for the key pair. Type in a name that is easy to remember, for example, yourname-droplet.

    For the passphrase, I recommend you leave it empty for convenience.

    After the key pair is created, you will see a message like this:

    Create SSH Key Pair on Droplet
    Figure: Create SSH Key Pair on Droplet

    The key pair is created and saved in the /root/.ssh directory.

  2. Type the following command to show the public key, which you will copy and add to your GitHub account:

    terminal
    cat /root/.ssh/dminhvu-droplet.pub

    You will see a long string of characters marked inside the green box in the image below. Copy the entire string.

    Get SSH Public Key
    Figure: Get SSH Public Key
  3. Next, we will add the copied public key in the previous step to your GitHub account. Follow these steps:

    • Go to your GitHub account and click on your profile picture in the top right corner.
    • Click on "Settings".
    • On the left sidebar, click on "SSH and GPG keys".
    • Click on the "New SSH key" button.
    • Paste the copied public key into the "Key" field and click on the "Add SSH key" button.
    Add SSH Public Key to GitHub
    Figure: Add SSH Public Key to GitHub
  4. We will have to verify if the created SSH key pair is working or not. Go to the Terminal on the server and type:

    terminal
    eval "$(ssh-agent -s)"
    ssh-add /root/.ssh/dminhvu-droplet
    ssh -T git@github.com

    Replace dminhvu-droplet with the name of your created key.

    Test SSH Connection between Droplet and GitHub
    Figure: Test SSH Connection between Droplet and GitHub
  5. Now, go back to your repository and click on the "Code" button to copy the repository URL.

    Get SSH Repository Remote SSH URL
    Figure: Get SSH Repository Remote SSH URL

    So, my repository URL is git@github.com:dminhvu/digitalocean-nextjs.git.

  6. Go back to the Terminal on the server and pull the code from the repository by typing the following command:

    terminal
    git clone <YOUR_REPOSITORY_SSH_URL>

    Replace <YOUR_REPOSITORY_SSH_URL> with the URL you copied from step 4.

    For example, mine will look like this:

    terminal
    git clone git@github.com:dminhvu/digitalocean-nextjs.git

    The output will look like this:

    output
    Cloning into 'digitalocean-nextjs'...
    remote: Enumerating objects: 19, done.
    remote: Counting objects: 100% (19/19), done.
    remote: Compressing objects: 100% (18/18), done.
    remote: Total 19 (delta 0), reused 19 (delta 0), pack-reused 0
    Receiving objects: 100% (19/19), 55.94 KiB | 4.30 MiB/s, done.

Cool, the next step is to make your Next.js application run on the server with the help of PM2.

Run Next.js Application with PM2

PM2 is a process manager for Node.js applications. It allows you to keep your application running forever, restart it if it crashes, and manage multiple applications at the same time.

In this section, we will install PM2 and run your Next.js application with it.

Follow the steps below to install and run your Next.js application with PM2:

  1. Change the directory to your Next.js application folder and install the dependencies by typing the following command:

    terminal
    cd digitalocean-nextjs
    npm install
    npm run build
  2. Install the PM2 package globally by using the following command:

    terminal
    npm install pm2 -g
  3. Start your Next.js application with PM2 by typing the following command:

    terminal
    pm2 start npm --name "nextjs-app" -- start

    The --name option is used to give a name to your application. You can replace nextjs-app with any name you want.

    You can verify if your application is running by typing:

    terminal
    pm2 status

    You should see a message like this:

    output
    ┌────┬────────────────────┬──────────┬──────┬───────────┬──────────┬──────────┐
    │ id │ name                   │ mode       │ ↺     │ status      │ cpu        │ memory     │
    ├────┼────────────────────┼──────────┼──────┼───────────┼──────────┼──────────┤
    │ 1  │ nextjs-app             │ fork       │ 259   │ online      │ 100%       │ 68.7mb     │
    └────┴────────────────────┴──────────┴──────┴───────────┴──────────┴──────────┘
  4. Keep PM2 running at startup when the server is rebooted using the following command:

    terminal
    pm2 startup systemd

Now, your Next.js application is running on the server, but it is not accessible from the Internet yet.

We will configure the Nginx server to serve your Next.js application in the next section.

5. Configure Nginx to Serve Your Next.js Application

In this section, we will configure Nginx to serve your Next.js application. We will set up a reverse proxy to forward the HTTP requests to your Next.js application.

Follow the steps below to configure Nginx:

  1. Create a new Nginx configuration file for your Next.js application by typing the following command:

    terminal
    sudo nano /etc/nginx/sites-available/<DROPLET_IP_ADDRESS>

    Replace <DROPLET_IP_ADDRESS> with the IP address of your Droplet.

  2. Inside the Nano text editor, type the following configuration:

    /etc/nginx/sites-available/167.99.48.57
    server {
        listen 80;
        server_name 167.99.48.57;
     
        location / {
            proxy_pass http://localhost:3000;
            proxy_http_version 1.1;
            proxy_set_header Upgrade $http_upgrade;
            proxy_set_header Connection 'upgrade';
            proxy_set_header Host $host;
            proxy_cache_bypass $http_upgrade;
        }
    }

    Remember to replace 167.99.48.57 with your Droplet IP address.

    Then, press Ctrl + O, Enter to write the file, and Ctrl + X to quit the file.

  3. Let's create a symbolic link to the /etc/nginx/sites-enabled directory that is read by Nginx at startup. Type in the following command:

    terminal
    sudo ln -s /etc/nginx/sites-available/167.99.48.57 /etc/nginx/sites-enabled/

    Again, remember to replace 167.99.48.57 with your Droplet IP address.

  4. We can test the Nginx configuration by using the following command:

    terminal
    sudo nginx -t

    If everything works, you will see a message like this:

    output
    nginx: the configuration file /etc/nginx/nginx.conf syntax is ok
    nginx: configuration file /etc/nginx/nginx.conf test is successful
  5. Now we can restart Nginx to make it read our new configuration, to do so, use the following command:

    terminal
    sudo systemctl restart nginx

Yay, you have made good progress. Your Next.js application is served at http://droplet_ip_address right now.

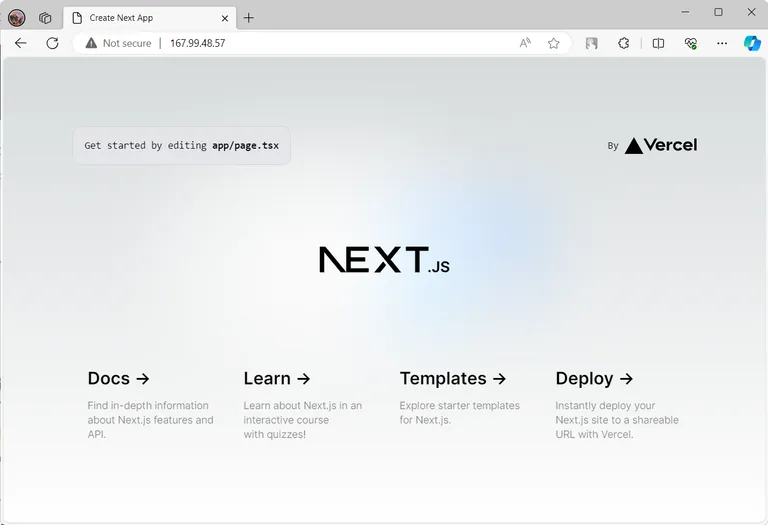
Accessing the URL via the browser, you will see the home page of your Next.js app like below.

Next.js Landing Page on Droplet IP Adress
Figure: Next.js Landing Page on Droplet IP Adress

As of now, we have made our Next.js app publicly available. To secure your site, we will need SSL/TLS encryption so that it will become https instead of http. I will keep updating this tutorial soon.

Conclusion

I'm so excited to see you progress to this section. We have finished deploying our Next.js application to a DigitalOcean Droplet.

If you have any questions, please feel free to send me a message at the contact page.

Minh Vu

Minh Vu

Software Engineer

Hi guys 👋, I'm a developer specializing in Elastic Stack and Next.js. My blog shares practical tutorials and insights based on 3+ years of hands-on experience. Open to freelance opportunities — let's get in touch!

Comments

harley w.

Feb 29, 2024

this guide is so underrated, Google should rank it higher btw can you add the remaining part to setup a domain, thanks

Leave a Comment

Receive Latest Updates 📬

Get every new post, special offers, and more via email. No fee required.